
I'm a total sucker for butterflies - as you already know :-) I love this tiara with tiny little brass butterflies on it!
Friday, February 29, 2008

Thursday, February 28, 2008
Mohop shoes
Have you heard about Mohop shoes? They're enviromentally friendly shoes, made by hand in a workshop in Chicago. I think that they would make fantastic shoes for a creative bride on her wedding day!
You can choose the shape of the footbed, the height of the heel and even add wedges if you like :-)
They're designed to be tied in all kinds of different ways, so you can get looks like this: Or this:
 Or if you really want to get creative and crochet your own straps, this:
Wednesday, February 27, 2008
sewing your own vintage-look wedding dresses
There are some wonderful vintage wedding dresses out there - as well as some lovely vintage dresses that would work as wedding dresses!
But what if you don't like the fabric it's made out of?
Or what if it's too small?
Or bits of it are falling apart!
Luckily, there are pattern companies who are making vintage-style patterns for modern bodies. Vogue has some lovely ones in their catalog:

 Click on the photos for more information.
Of course, if you prefer to work from the original sewing patterns, So Vintage Patterns is the place for you!
Monday, February 25, 2008
making your own invitations using kraft paper
I've already given you a few ideas for using scrapbooking paper to make wedding invitations, but what if the metallic paper I used is too sparkly for you?
How about using brown kraft paper instead?  The same rules apply if you're going to use vellum, but kraft paper is a little bit more flexible - most inks will work beautifully with it.
 I stamped a pink leaf pattern on the craft paper, and then used black ink to stamp the word "love" underneath it. I used a floral stamp on the vellum. The design didn't photograph that well, but using multiple layers of stamps can be a great way to customize invitations.
Saturday, February 23, 2008
win free tickets to the first Eco-Wedding & Lifestyle show

Would you like to win a pair of tickets to the very first Eco-Wedding & Lifestyles show, held in Toronto? Just click here to visit the Tree Hugging family blog & enter!
short & sweet Saturday links
I think this is the ultimate in being a creative bride - spinning your old wedding dress into yarn!
Friday, February 22, 2008
Friday photo inspiration

There are tons of options for decorating cupcakes as well - I love the elegance and simplicity of these black & white ones.
Friday photo inspiration
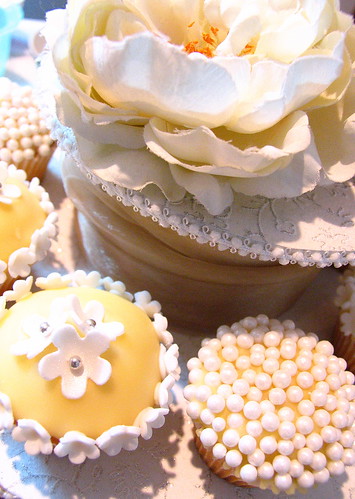
Wedding Cupcakes for a Magazine Shoot!, originally uploaded by kylie lambert (Le Cupcake-Australia).
Cupcakes make a great alternative to a wedding cake - without the worry of cutting the cake either :-)
Thursday, February 21, 2008
creating your own wedding invitations with metallic paper
I love how metallic scrapbooking paper looks & feels - it's silky and still has enough weight to hold up to all sort of embellishments... Which of course is why I used it when I designed these invitations.
There are a few things to remember when you're going to use metallic paper or vellum.
- Use a permanent stamp ink (I like Staz-On - it's what I used to create the sample cards)
- Let the paper dry for at least 20 minutes (or longer if it's humid outside) before touching or even stacking the paper.
- Make a few test cards before you create 200 cards and discover that the ink you chose doesn't show up!
- If you're using an ink-jet printer to print on the vellum or metallic paper, it's very important to just print one sheet at a time. The same rules apply for printing that apply to stamping - let it dry thoroughly!
 I used a 6" by 12" sheet of metallic paper, folded in half to make the top card. I cut a 2" square out of the centre (using a gridded quilting ruler makes it easy!). The liner is a 5" by 10" piece of vellum, folded in half. I used a small dab of glue in the centre fold of the card to anchor the vellum. I used a hole punch to cut two small holes in the centre fold - approximately 2" apart. I used a scrapbooking punch to create the holes. I threaded a 6" length of sheer 5/8" wide ribbon through the holes and tied a knot. I trimmed the edges of the ribbon at an angle, but you could also cut little dove tails in as well. I used a butterfly stamp and black ink to stamp the butterfly.
 This card is just a single 4" X 11" sheet of metallic paper. I stamped directly onto the metallic paper (remember to let it dry!) The top layer is a 3.5" X 10" sheet of vellum. I used the same hole punch to punch the holes, approximately 1" apart. To make this bow, thread both ends of the ribbon from the right side to the wrong side of the card (they should be even on the back) You'll have an even, flat loop of ribbon on the right side. Turn the card over and thread both ends of the ribbon to the right side, out the opposite hole they were threaded into. Trim the ends, and presto, you're done!
 Of course, you still need to put all those pesky details like place, time...
Wednesday, February 20, 2008
using scrapbooking paper & vellum to create your wedding invitations
These cards are from one of my classes that I teach - and you guys get them for free :-) I've used metallic & brown craft paper, vellum, stamps & ribbon to create these easy & elegant invitations:
I'll show you how I created them in the next couple of days...
Monday, February 18, 2008
Saturday, February 16, 2008
short & sweet Saturday links
I'm a huge Etsy fan (in fact, I even sell my work in my own Etsy shop) - so I was thrilled when I found the "Etsy Wedding" blog. It's filled with all sorts of wonderful wedding items - all hand-made and unique.
Friday, February 15, 2008
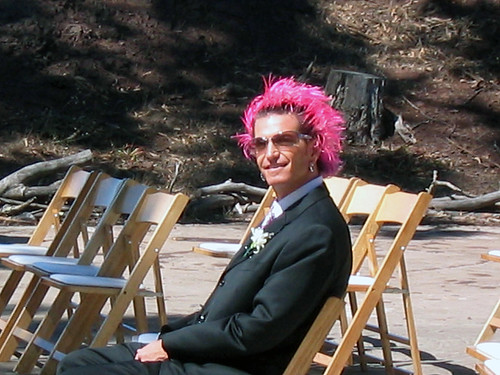
Friday photo inspiration
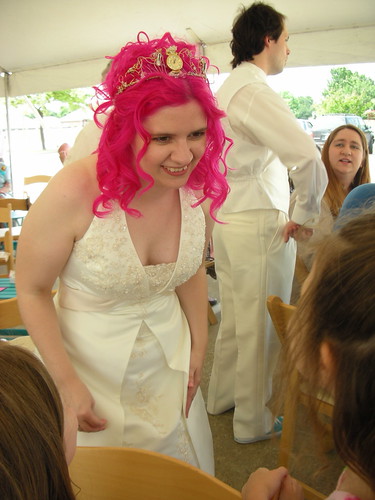
I just dyed my hair pink yesterday, which inspired me to go hunting for brides with funky pink hair too! I love her unique tiara as well...
Thursday, February 14, 2008
planning bridal outfits with Polyvore
Have you had a chance to play with Polyvore yet? It's an online outfit designing program (free to use!) It's great for high fashion - but it also works beautifully for planning bridal outfits as well, especially if you're wanting something a little different :-)
I spent some time this morning and came up with three outfits - in only half an hour or so! There are thousands of options for dresses, skirts, accessories & colours - it's definitely worth playing with it if you're not quite sure what you want to wear on your big day.
Want to go with something sleek & contemporary?  Or you don't want to do the traditional white?
 Or you're planning a relaxed, outdoor wedding?
Wednesday, February 13, 2008
embroidered wedding invitations
 I love working with fabric and embroidery - so I came up with an easy way to make your own embroidered monogrammed wedding invitations or thank-you cards.
Here's part one of the tutorial
And part two Just a reminder - all content on this blog is copyright and is not to be copied, re-used or re-posted without my express written permission :-)
Monday, February 11, 2008
making your own wedding favors? out of chocolate?
I wanted to give wedding favors that, A: tasted good, and B: kept with our colours & theme. So if you're following me here so far, they needed to be blue, green or brown butterflies and not taste like chalk.
Doesn't sound too hard right?
I loved these.
But they don't ship to Canada.
I did some looking around and couldn't find a Canadian source for them. Sigh...
We still wanted to go with something yummy, inexpensive and in our colours. I've made candy to give as gifts for years now and thought I was up to making our own favors. I spent some time browsing through my local craft store (they have a surprisingly good selection of candy making supplies!) and found some lovely heart-shaped molds for poured chocolates. No butterflies unfortunately...
I bought the molds & some milk chocolate and tested them out - they worked great!
I enlisted the help of my sister-in-law and we spent a couple of hours pouring chocolates (thank goodness for freezers!)
In the space of two hours we had over 100 chocolate hearts, ready to be bagged up :-)
Here's how I wrapped them: They got slipped into cellophane bags (50 bags for $7 - not bad) and tied with an origami butterfly. The whole thing cost less than $100 and only took a few hours to do - and we got a ton of compliments on them too!
Of course, months afterwards - I found out about these little chocolate molds...
Saturday, February 9, 2008
short & sweet Saturday links
Here's a great link for step-by-step instructions on making your own wedding bouquet.
Friday, February 8, 2008
Friday photo inspiration

What can I say - I'm a sucker for a man in a kilt :-) It's my Scottish roots showing... I love the bride's ribbon skirt!
Friday photo inspiration

There are some wonderful photos on Flickr of people's wedding colours - lots of inspiration!
Thursday, February 7, 2008
my wedding colours
In my last post I mentioned that my DH & myself had chosen blue, green & brown as our wedding colours. I wanted to show you how we worked them into our wedding - I loved the way they coordinated with everything :-) The cakes had chocolate fondant icing with tiny blue & green butterflies. They also had red & white flowers, to match the bridal party's flowers. I hit up my local craft store and bought spools of every ribbon I could find in combinations of green, blue or brown. I even ended up gluing layers of ribbon together to get the look I wanted.
 My mom wove the fabric to make my DH's vest - I think that was one of the biggest projects of the whole wedding! There are many hours of work woven into that vest...
I sewed it together :-) Unfortunately, I don't have many photos of the tables :-( I used candles & glass pebbles in blue & green for the centrepiece. The favors were definitely a group labour of love! My MIL & I folded the origami butterflies, I made the chocolate hearts with my SIL and we all got together to put them together.
  My bridesmaids wore brown dresses and/or skirts & tops (I picked the fabric and let them pick their own dress patterns) in matching fabric. I sewed sheer chiffon shawls for them in either blue or green. I ended up sewing the shawls the afternoon before we got married!
I loved the way the colours worked together - have fun with your own wedding colours & be creative!
Wednesday, February 6, 2008
choosing your colours

You know you want to use colours that are unique, beautiful and say something about you & your fiance, right?
How on earth do you narrow all those choices down to something that will actually work for you?
Luckily, the internet is filled with all sorts of fantastic colour guides that can help you out.
Pantone is the grand-daddy of the colour forecasting companies, and their seasonal forecasts are definitely worth checking out for inspiration. Their Fall 2008 fashion forecast was just released and has lots of yummy colours that would be perfect for a wedding!
Color Blender is on online tool for selecting colour palettes that look flattering together - you can play for hours with this one!
The Knot has photo galleries of real weddings that you can search or browse through by colour. They've got pink, red, orange, blue, brown & more.
My DH & myself chose a wedding palette of blue, green & brown - the colours of our eyes :-) My eyes are blue & his are hazel (a mix of green & brown) The colours coordinated beautifully with each other and gave us the unique look we were looking for.
Image source
Monday, February 4, 2008
re-fashioning vintage jewelery for weddings
 I adore vintage & antique porcelain flower jewelery! There's a story behind that... but you'll have to wait to hear it :-)
I decided that I wanted to wear flowers in my hair for my wedding (wasn't wearing a veil or tiara) and decided that the porcelain or china flowers would look lovely. They are quite easy to find on eBay (I found several in second hand shops as well) and not that expensive. In fact, I got so enthusiastic with my finds that I ended up with waaaay too many flowers :-)
But, how to wear them in my hair? I didn't really want to risk sharp points from the brooch backs on my scalp.
I took a risk and used pliers to pry the pin back off the cheapest flower brooch (I figured it was better to risk breaking the $2 rather than the $15 one!) and miracle of miracles - the old glue gave way and peeled off cleanly!
If you want to make your own hair pins, you'll need some bobby pins or hair clips (my local Michaels store carries bobby pins for making your own hair accessories in their wedding department) as well as a glue like E6000. I just put a dab of glue on the back of the flowers and let them dry overnight.
Because I had some extras, I decided to give them to my bridesmaids, to wear on their shawls: I was tickled pink with how the flowers looked in my hair - with no chance of wilting!
Saturday, February 2, 2008
short & sweet Saturday links
Check out the gorgeous vintage dress this Australian bride wore for her wedding!
Friday, February 1, 2008
Friday photo inspiration

Don't be afraid do something other "the white dress"! There are so many ways of expressing your personal style out there :-)
zombie brides
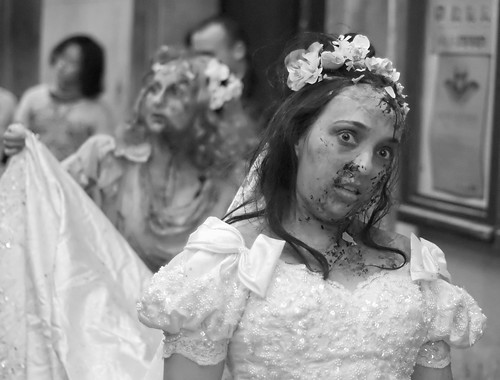
Now - this might not be everyone's style of choice for your wedding - but if you & your fiance are zombie-philes... go for it!
Subscribe to:
Posts (Atom)

