Congratulations Daphne - you've won the pair of earrings!
Thank you to everyone who has entered - and keep watching, because there are more contests coming up :-)
Monday, June 2, 2008
and the winner is...

Saturday, May 31, 2008
Artsy bloggers round-up
![]()
- A Happy Little Woven Pouch full of sweet sisterly memories
One thing always leads to another, doesn’t it? Reading a sweet book inspired Noreen to weave a little amulet bag in honor of a dearly loved sister. - De-Cluttering my Craft Room the FlyLady Way
Eileen tackles those piles of “inspiration” that seem to accumulate in any artist’s workspace … 15 minutes at a time. - Digital Painting Tutorial
Some more from the lovely and talented Genece Hamby. - Kitchen Message Center from Cutting Board
Have a used up cutting board? Here’s an idea to give it new life. - Layers Upon Layers
Cyndi’s mixing it up again with another project combining physical and digital art! - Link-roundup for the silk paper how-to
Chloe has completed the silk paper project and posted a complete list of all the links. - Update on the fake wasp nests
Noreen Crone-Findlay designed a crocheted fake wasp nest to keep the beasties at bay, and her husband has turned one in wood. Here’s the update on how the wasp away’s are working:
image source: Stock.xchg
Friday, May 30, 2008
Sunday, May 25, 2008
Artsy bloggers round-up
![]()
Be gone foul wasp!
Noreen crocheted fake wasp nest to trick the wasps and yellow jackets into staying away from her home. Let’s hope it works!
Freaky Friday #66
A great visual journal writing prompt.
Is this a Blog? Or is it a Website??
Are you confused by the distinction between a blog and a website? Eileen tries to sort things out for you.
Layers Upon Layers
Torn paper landscapes are super-simple backgrounds for collage!
Review: Last-Minute Fabric Gifts
This junk book helps you transform clothing you no longer wear into fun gifts like recycled sweater hats.
Sewing a wasp decoy?
Chloë was inspired by Noreen’s crocheted wasp decoy to try sewing a fabric wasp nest.
image source: Stock.Xchg
Wednesday, May 21, 2008
contest reminder - there's still time to enter!
 There's just over a week to enter to win these glass dangle earrings - just remember to read the instructions before you enter!
Saturday, May 17, 2008
Artsy bloggers round-up
![]()
I'm sorry about the lack of posting this week - but when you check out my link from Tangled Thread, I think you'll see why! I've been elbow deep in hand-sewing, but it's done and I'll be back this week with a brand-new tutorial and free pattern!
1000 Journals Project
Links to the amazing 1000 Journals Project, in case you’ve missed it so far.
How Will the Orphan Works Bill Affect Ownership of Your Art & Written Work?
Mary Emma at Quilting and Patchwork wonders what you think of the proposed Orphan Works Bill in the US Congress and how it will affect artists, writers, and artisans.
Layers Upon Layers
The incredibly talented Judy Coates Perez has done an artist profile for Layers Upon Layers!
Make Embellishments From Aluminum Cans
If you have a die cut machine and some pretty cans, you can make your own embellishments. Just don’t cut yourself to ribbons while you’re making them!
Organizing and storage of a yarn stash
Noreen Crone-Findlay has posted pics of some of the ways that she organizes and figures out storage solutions for her yarn stash. Here’s the link….
Preserve Your Precious Photos
If you save precious photos on your computer, you need to know about Carbonite online backup subscription service.
The completed memorial textiles
Chloe, from Tangled Thread had finished the memorial textiles created in honor of her grandmother.
Vacation Scrapbook Planter from Sour Cream Container
Reuse a sour cream container as a planter and scrapbook all in one.
image source: Stock.Xchg
Friday, May 16, 2008
Friday photo inspiration

102_123504_079022202809.jpg, originally uploaded by meow8dotcom.
I love seeing people who include their animals in their wedding ceremony. One of my dogs ended up being our honorary ring-bearer when my DH & I got married last summer! We decided to leave the parrot at home though - I didn't think that she would make a very good flower girl...
Sunday, May 11, 2008
Artsy bloggers round-up
![]()
A quick and easy market bag to crochet for ‘WOW MOM’s!
Noreen Crone-Findlay designed a quick and fun market bag in honor of all the Wow Moms out there. And it’s good for dear old mother earth, too!
Decoupage a Byzantine Cross Pendant
Eileen shares instructions for a decoupage Byzantine cross pendant made from cardboard - of all things!
Digital Photomontage Demonstration
Links to a simple photomontage tutorial.
Glorious Gourd Decorating
A quick review on a great resource for gourd decorating.
Layers Upon Layers
Take one cheap piece of felt and transform it into “leather”!
Gadget Wish List for Quilters
Mary Emma at Quilting and Patchwork wonders what you have on your dream list of quilting gadgets
Spring-time felt flowers
Inspire kids to start sewing with this easy felt flower from Tangled Thread
Wooden craft boxes as wedding favors
Chloe from the Creative Bride suggests painting charming & inexpensive wooden boxes to give as wedding favors
image source: Stock.Xchg
Tags: art-blogs, artsy bloggers rounFriday, May 9, 2008
Friday photo inspiration
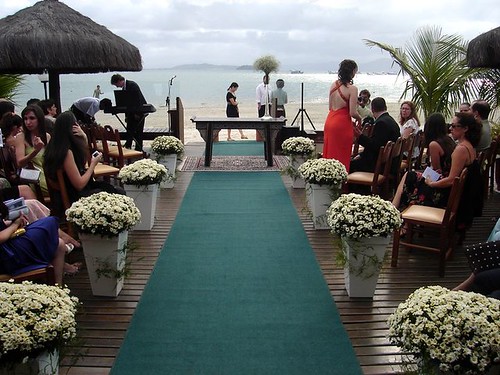
Casamento na praia, originally uploaded by Luís Guilherme.
You don't need to do a lot of decoration if your ceremony location is as beautiful as this one is!
Wednesday, May 7, 2008
wedding favor ideas - painted wooden boxes
 Are you looking for an easy, inexpensive, handmade wedding favor? How about little painted wooden boxes? The box I painted for this sample cost a grand total of $1.50 at my local craft store (the big one that starts with the letter "M"). Paint? $3.50 per bottle... plus a little time. You can monogram the boxes or decoupage them to match your wedding theme.
Don't forget that the earring contest is still on!
Sunday, May 4, 2008
Artsy bloggers round-up
- How to make silk paper
Tangled Thread has created a how-to for making your own silk paper, using raw silk fibers. - Layers Upon Layers
Fabulous mixed media artist Andie MacCowan shares about her artistic journey!
- Make Yourself a Giant Check
No, Eileen doesn't tell you to click on this link and win a million dollars. She tells you how to create a giant check for presentation. - Mixed Media Earth Friendly Woven Dolls
This week, Noreen Crone-Findlay finished weaving a very special doll, 'The Earth Listener Angel Doll'. She's uploaded photos of the making of the doll, as well as pics of some of her other mixed media woven dolls. The links are on: - Red Castle Templates
Links to excellent templates, mostly free for you to download. - The Delights of Blogging About Quilting
Mary Emma Allen, at Quilting & Patchwork, discusses the enjoyment she finds in blogging about quilting and connecting with other quilters and fabric artists.. - win a pair of beaded dangle earrings
The Creative Bride is giving away a pair of her beaded dangle earrings - just make sure to real the rules before you enter :-) - Cat Toy (and more) from Ketchup Bottle
- Learn about all the cat-related uses for an empty ketchup bottle.
- A Call for Alzheimer's Related Art
- I am compiling art for an ezine titled "A Portrait of Alzheimer's" and am putting out a call for artwork and poetry.
image source: Stock.Xchg
Friday, May 2, 2008
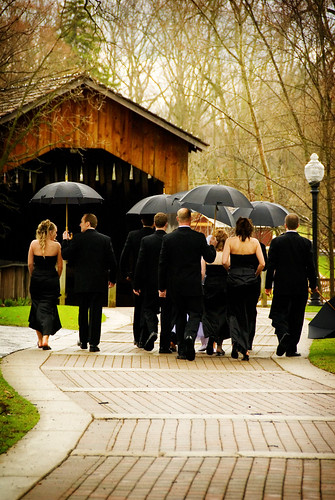
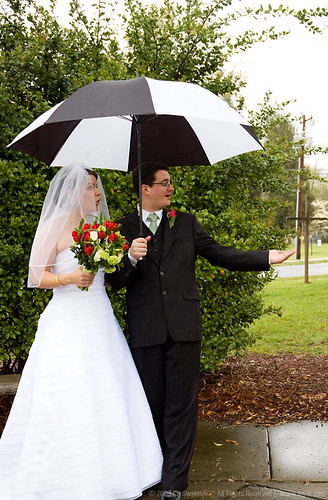
Friday photo inspiration
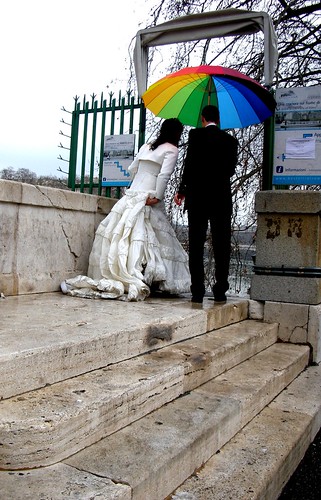
an unfortunately ruined dress, originally uploaded by tarts larue.
It's cool, grey and rainy... and your wedding is due to start - what's a girl to do? Grab a fabulous umbrella and enjoy your day!
Tuesday, April 29, 2008
win a pair of beaded dangle earrings
As I promised on Thursday, I've got a special treat for you... I'm holding the first-ever Creative Bride contest! The lucky winner will win this set of earrings - the same ones I created to demonstrate this tutorial: To enter, just leave a comment on this post, explaining *why you deserve to win the earrings*!
The rules:
- One entry per person please.
- Leave a valid email address so I can contact you if you're the winner (it won't be shared)
- The contest will run from now until May 31st.
- I reserve the right to delete entries not fulfilling the entry requirements (ei - don't leave a comment just saying "thanks")
Saturday, April 26, 2008
Artsy bloggers round-up
Quilters often turn to quiltmaking in times of stress, crisis and disaster. Mary Emma Allen, of Quilting and Patchwork, mentions a scene in one of her books about quilting during the Civil War.
Cornstarch clay- can it look like turquoise?
Noreen Crone-Findlay is working on a new doll. She’s spun the yarn to weave the body, and sculpted the head from cornstarch clay. She painted it to look like carved turquoise.
Creative Scarecrows book review
Yard people aren’t just for the fall. Check out this book for inspiration.
Keeping a Knitting Journal
Links to free knitting journal page downloads to keep your knitting organised.
Layers Upon Layers
Cyndi got a new tool — a forstner bit — and couldn’t wait to come up with a project to use it…
Make your own wedding earrings
The Creative Bride has created an easy tutorial to make these feminine dangle earrings.
Tangled Thread’s final De-Stash challenge check in
Chloe has put together a list of her favorite De-Stash challenge projects from the past six weeks.
Tea Tag Bookmark
A simple reuse project for tea lovers.
What Did I Accomplish This WeeK?
Did you ever come to the end of a week and ask yourself, “What in the world did I do all week? Eileen muses on her week.
image source: Stock.Xchg
Friday, April 25, 2008
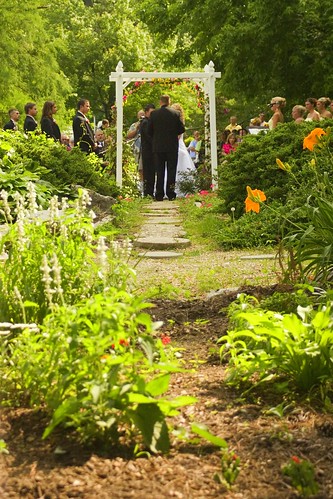
Friday photo inspiration
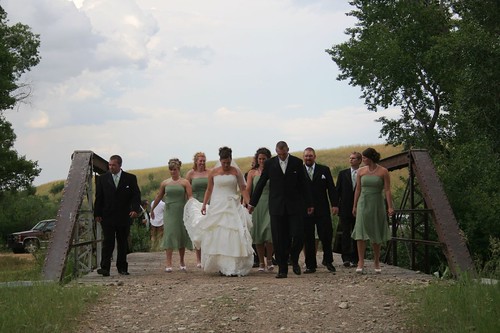
AshleyJosh_1300, originally uploaded by Shindig Photos.
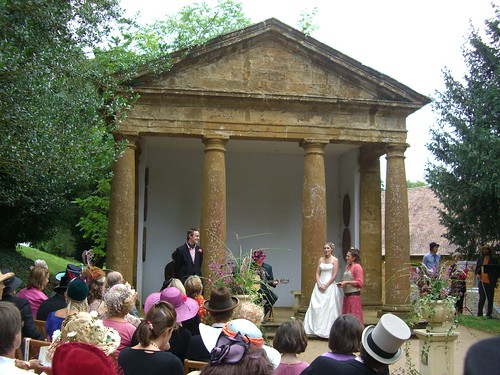
I thought that today's Friday Photo Inspiration should be all about outdoor weddings. After all, it's starting to warm up enough that your guests won't get frostbite :-)

Thursday, April 24, 2008
tutorial: easy dangle earrings, part two
Ready to start creating? I gave you a list of supplies yesterday - got them all? Just as a reminder, this is an original design so please don't copy the pattern - feel free to email the link though :-)
To begin, you'll need to trim six headpins to three different lengths - like this: Each earring needs three headpins, each one with an approximate difference of 1/4". I'm using 2" headpins, so I trimmed to first two to a length of 1-3/4". The second pair is 1-1/2" long and the short pair of headpins are 1-1/4" long. You can also adjust the lengths if you prefer shorter or longer earring dangles as well.
Place your beads onto the headpins - I needed to use seed beads at the end to stop the bigger focal beads from slipping off: We now need to curl the top of the head pin into a complete circle like this:
 Use your round nose pliers and gently curl the headpin to form the circle.
Use the needle nose pliers and crease the headpin at the bottom of the circle - the dangle will hang straighter that way: Open up with the circle and slide the ear wire into it. Close the circle again, so the earring looks like this:
 Now repeat the step with the other earring. Each earring should have three headpins, each a different length.
Here's how the finished pair look: The sky really is the limit with this simple design - you can use pearls, or crystals, or shiny glass beads...
Wednesday, April 23, 2008
tutorial: easy dangle earrings
Time for a new tutorial! Do you want to make your own jewelry for your wedding, but aren't sure where to start? This is an easy design (it's one of my more popular classes) to create a versatile pair of earrings in less than an hour. Just a reminder, this is an original design, so please don't use the photos or text - feel free to email the link though :-)
You'll need:
- needle-nose pliers
- round nose pliers
- bent nose pliers, or a second set of needle nose pliers
- wire snips (optional, lots of jewelry needle nose pliers have wire snips built in)
- head pins (I'm using plain ones for this project, but you can get head pins with fancy ends like rhinestones or little hearts)
- ear wires (use gold or sterling silver if your ears are sensitive
- six small focal beads
- optional: smaller "E" or seed beads if your focal beads have large holes.
Saturday, April 19, 2008
Artsy bloggers round-up

Cover girl! Here’s my heart…..
Noreen Crone-Findlay designed, spool knitted and wove a wonderful heart. The art director at Harlequin Romances liked it so much that she bought one for the cover of a new Harlequin Romance. And now, they’re holding a contest so readers can win the heart. Here’s the link….
Digital Painting Tutorial
Artist Genece Hamby shares her pushing colour tutorial.
How to Attach Vintage Buttons to a Charm Bracelet
Antique buttons make special charm bracelets. Here’s how to attach the buttons without destroying their value as collectibles.
Inspiration Comes From the Strangest Things
Make a colorful background for your artwork.
Layers Upon Layers
Cyndi has a great magazine to give away…as a bribe!
Trails End Quilters of the 1870’s - My Quilting Heritage
Mary Emma, at Quilting and Patchwork, reminisces about her quilting heritage and urges you to discover yours.
Use t-shirts to create a recycled, reversible totebag
Chloe from Tangled Thread has created a tutorial for making an easy totebag using a t-shirt
Vintage Gift Tags
With your love of old magazines, create inexpensive, easy-to-make gift tags your friends will cherish.
Scrapbooking your wedding
The Creative Bride has been busy creating the first few pages of her wedding scrapbook.
image source: Stock.Xchg
Friday, April 18, 2008
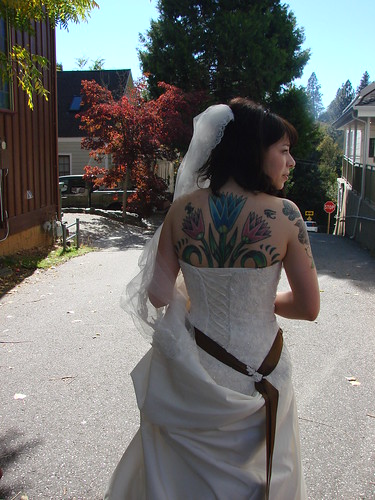
Friday photo inspiration

amanda kaotik, originally uploaded by vingt_deux.
For this week's Friday Photo inspiration, I'm going with tattoos on brides. There is some spectacular artwork out there and I think that brides shouldn't be afraid to show it on their wedding day!
Tuesday, April 15, 2008
scrapbooking your wedding - part two
I showed you the first page of my wedding scrapbook yesterday - here's the next two pages: My DH & myself used butterfly stickers to decorate the programs, but we ended up using two different kinds of stickers. What's a person to do? Put one of both programs into the scrapbook!
 I was glad I saved some extra programs - they're a lovely reminded to have :-)
Again, I used really simple layouts and just added some butterfly stickers to these two pages as accents. If your invitation folds open, using multiple copies of it in your wedding scrapbook (like I did with my programs) can be a great way to show everything.
I'll post more pages as I create them :-)
Monday, April 14, 2008
scrapbooking your wedding
I've just recently started to put together a scrapbook for my wedding (yes, I know it's taken almost 8 months - I'm a busy person!) and am glad I saved things like extra wedding programs :-) This is the first page of the scrapbook. I layered one of the invitations with an envelope (with one of the wax seals we used for hand-delivered invitations) I used an archival double-sided tape to attach everything to the paper. It's important to use archival materials, including paper, glue and even the scrapbook itself. You don't want to put all that time and effort into making something that's going to fall apart and discolour in a couple of years.
So far, I'm going with plain and simple embellishments - but of course I may change my mind too... I'll show you the next two pages tomorrow :-)
Saturday, April 12, 2008
Artsy bloggers round-up
An “Elephant” Strategy to Quilting Business Success
In her new book, Karin Abarbanel provides a woman’s “go-for-it!” guide to developing a business…whether in quilting, crafts, or other areas.
Does Your Art Shock You?
If you are startled when you look at your art the next day, you are doing something right.
Eco projects to celebrate Earth Day
Noreen Crone-Findlay has been having a wonderful time reclaiming wood from a broken loom and a melted down old desk. She's made some very fine bag handles and some fab eco bracelets. Every Day is Earth Day, right?
In Search of Craft Balance
How to squeeze more time for your art into your busy days.
Junk Project: Orange Bird Feeder
Learn how to make a bird feeder from a used orange peeling.
Layers Upon Layers
A clock-junkie shares what to do with those annoying AOL cds…
Make Artistic Stickers for Your Journal
Links to an easy tutorial for making your own artistic stickers.
Things You’d Never Imagine From Beer Cans, Gloves and Chairs
Explore the beautiful work of junk artist Paul Villinski.
Hand-sewing special projects
I've been working with my mum to create a series of hand-sewn runners to commemorate my grandmother.
image source: Stock.Xchg
Friday, April 11, 2008

Friday photo inspiration

It's starting to feel like spring in my neck of the woods - the tulips are finally poking through the soil!
In honor of the promise of new flowers, today's Friday Photo Inspiration is all flowers.
Wednesday, April 9, 2008
tutorial: embroidered blessing ribbons
I showed you one of the "blessing ribbons" I created for my wedding in the last post. Essentially, I programmed a message into my sewing machine (an older computerized sewing machine with embroidery features) and stitched it onto lengths of grosgrain ribbon.
I also created some test ribbons using strips of duppioni silk: The green is grosgrain ribbon and the blues are silk. I embroidered my brother and his fiancee's names and the date of their wedding onto a white ribbon, which then got wrapped around their guest book:
 It's hard to make out the writing in this photo, but the embroidery is a lovely, subtle way to mark something with dates and names.
If you don't have a machine capable of embroidering letters, why not hand embroider ribbon? You could even paint it on as well! I'm making a series of these to include in my wedding album and scrapbook.
Tuesday, April 8, 2008
embroidered blessing ribbons
 I wanted a subtle way to include names, dates and even little messages into projects I made for my wedding, as well as my brother's wedding (two weddings in three months - it was a busy summer!)
I came up with embroidering "blessing ribbons" using my computerized embroidery machine. In my next post I'll show you how I created them and how you can use them in your own wedding preparations!
Monday, April 7, 2008
the wedding dress for the really creative bride on a really tight budget
Are you short on cash but long on time and creativity? This talented Craftster has put together an impressive wedding dress for $10... from dollar store shower curtains and ribbon!
Saturday, April 5, 2008
Artsy bloggers round-up
 Creative ways to use up your stash - dyeing fabric
Tangled Thread shows how to re-work a piece of fabric that she no longer likes - by dyeing it.
Jennifer Chiviarini’s New Book - The Winding Ways Quilt
For those who enjoy the Elm Creek Quilters’ series, a new novel was just released.
Layers Upon Layers
Have a good time just playing with paper strips! Sometimes the results are amazing, sometimes they’re just plain fun!
Some Things You Can – and Can’t! – Do with Your Graphic Software
Eileen at The Artful Crafter talks about how you can use computer software design programs to create customized and unique designs without violating copyright.
Tiny and easy to make Worry Dolls
Oooh… there seems to be so much to worry about these days. Why not take a brief holiday from worrying and make some enchanting little Worry Dolls for yourself and your friends. Noreen will show you how.
Your Treasure Map
Links to an exercise for creating your personal treasure map.
Friday, April 4, 2008
Friday photo inspiration
It's lovely to be back! For a special treat, this week's Friday Photo Inspiration is from my own wedding :-) I just got the "official" photos back and wanted to share a few with my lovely readers. I created the centrepieces using vintage silver trays, glass vases, tea lights & holders and coloured glass pebbles. Cost? Approximately $8 per table - and they looked awesome! Several family members helped track down the trays - mostly from second hand stores :-)
 The wedding cakes, surrounded by origami butterflies. The cakes were decorated with fabric ribbon, stencilled icing butterflies and little sugar flowers to match the real flowers.
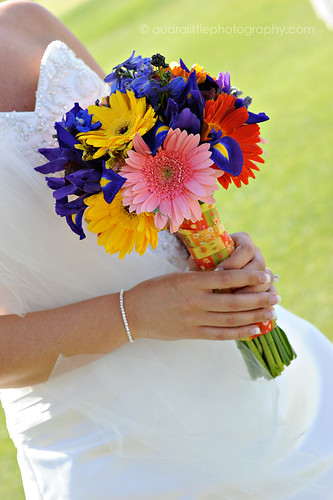
  My bouquet, that I created the morning of the wedding - it was easy to do and ended up costing a quarter of the price of getting the bouquets made by a florist. It's definitely worthwhile doing a test run first though!
Thursday, April 3, 2008
I'm back!
Sorry about the delay folks, it took awhile to get the technical issues sorted out! Okay, here's the scoop - you can reach The Creative Bride at:
http://thecreativebrideblog.com
or the original Blogspot address:
http://thecreativebride.blogspot.com
But for some reason, www.thecreativebrideblog.com doesn't work...
Go figure!
I'll be back tomorrow with some yummy photos :-)
Tuesday, March 25, 2008
changing domain names
Hello all, this is just a brief note to let you know that I'm switching my current domain name from www.thecreativebride.blogspot, to it's brand new one: www.thecreativebrideblog.com
There may be a couple of days where you can't reach the blog, but never fear - I'll be back as soon as I can!
Saturday, March 22, 2008
Artsy bloggers round-up
 Delightful spool knitted goodies- Kittycat bookmark
This week, Noreen has designed a couple of really fun treasures- it all began with a spool knitted kitty cat bookmark, which lead to a springtime bunny. Who knows where it will all end?
Layers Upon Layers
Want to try collage? Here’s an easy way to put those background papers and textured bits and bobs to use!
Make A Museum Store Quality Decoupage Plate
Eileen at The Artful Crafter gives step-by-step directions for decoupage under glass with a couple of unique twists.
Miracle of the Egg
A mixed media piece in celebration of the amazing egg.
Sisters on Sojourn Website Update
Check out what the Sisters have for visual journal keepers
Student Makes Quilt Depicting Slavery & the Underground Railroad
Youngsters can learn much by making quilts in connection with their classes. One 5th grader designed a very interesting project.
The Creative Bride
Complete the embroidered flower brooch that we started last week, using this tutorial
Use your sewing machine to create easy, charming embroidered felt easter eggs with Tangled Thread.
Friday, March 21, 2008
Friday photo inspiration

I love bubbles at weddings... in fact - I had bubbles at my wedding! It's a fun, light-hearted way to involve your guests in the ceremony. Just make sure to buy stain-free bubbles!
Thursday, March 20, 2008
tutorial: embroidered flower brooches - part two
Ready to finish up your flower brooch? Here's the first set of instructions if you missed them :-)
Just a reminder, this is an original, copyright pattern that I've put a lot of time & energy into creating. Please don't copy the post - but feel free to send the link to people !
Lay the smaller flower centre on top of the bigger bottom one and tack together using running stitches: I decided to use buttons as the centre of my flower brooch, but you could also use beads as well. Use a needle & thread with four strands of thread (or two strands of heavy-duty hand sewing thread) Begin randomly sewing buttons (or beads) onto the centre of the flower, building up layers as you go. I used several different styles of buttons, both clear & ivory. If you look closely you can even see a little cupid button!
Sew a pin back (or hair clip) onto the back of the brooch and enjoy!
Wednesday, March 19, 2008
tutorial: embroidered flower brooches - part one
As promised, here's part one of the tutorial to create an embroidered flower brooch. I asked you last time to have these supplies - ready to go?
The first step is to draw a flower shape onto a piece of plain paper. I went with an uneven flower - nothing fancy: Trace the flower onto your netting and fold it over so you have two layers of netting. Don't cut the flower out yet! Using a zig-zag stitch, stitch all the way around the flower, just slightly to the inside of the pen line.
Okay, now you can cut the flower out!
Now we need to stabilize the edges: Sew a length of yarn or cord around the edge of the flower, using a zig-zag stitch. I'm using a mohair yarn with little picots on the edges:
 I sewed into the centre of the flower, just to give it a little definition. Here's how it looks out from underneath the sewing machine:
 I then stitched another cord across each petal, to mimic the central "ribs" that some flowers have. This also stabilizes the brooch as well. Again, just use a zig-zag stitch to stitch the cord down. I'm using a soft, twisted satin cord:
 I wanted to add a little bit more glitz to the brooch, so I went over the edges with a metallic machine embroidery thread, again - just zig-zag. I used a silver thread over the central ribs of the flower.
You've got the first layer of the brooch done!  Now repeat the same steps over again, just with a slightly smaller flower - that's the inside of the brooch. I'll show you how to connect everything - but that's for tomorrow :-)
Subscribe to:
Posts (Atom)

